
Mastering Presentation Design Best Practices & Delivery
Learning how to make an effective video presentation requires adapting your strategy for virtual audiences. Unlike live in-person talks, recorded presentations need crisp presentation design best practices, high-impact visuals, clear audio, and strong visual connection to keep viewers engaged from start to finish. Follow these 10 actionable video presentation tips to refine your layout, audio, and delivery.
1
Craft a Compelling Title Slide
First impressions matter immensely. Your title slide sets the aesthetic tone and signals high quality to your audience before you even begin speaking. An exceptional title slide builds trust and sets clear expectations. Conversely, a cluttered slide signals a lack of preparation. Invest time in creating a visually striking cover slide that establishes authority immediately.

2
Keep Slides Simple and Uncluttered
Core presentation design best practices center on visual clarity. Slides are meant to complement your spoken words, not replace them. Avoid filling every pixel with dense text boxes or irrelevant graphics. Embrace white space to let key points breathe. When you record your presentation using an online presentation recorder, minimalist slides make it much easier for viewers to follow along without feeling overwhelmed.

3
Use High-Resolution Quality Graphics
High-quality imagery instantly elevates your video's professionalism. Use crisp, high-resolution photographs or diagrams and ensure you have proper licensing rights. Avoid stretched images, low-res pixelated screenshots, or dated clip art. Clean visual hierarchy combined with modern graphics keeps your audience focused on your story rather than poor formatting.

4
Choose Suitable, Large, and Readable Fonts
Typography carries a silent aesthetic message. Stick to a maximum of two complementary fonts throughout your deck. For digital screens, sans-serif fonts (like Inter, Arial, or Roboto) provide much better legibility than complex serif fonts. Ensure your body copy and headings are large enough to read easily on mobile devices and smaller screens.

5
Produce Crisp, Clear Audio
Crisp audio quality is critical for audience retention. Viewers will tolerate mediocre visual quality, but poor audio will cause them to click away immediately. Using a dedicated external USB microphone or headset eliminates echo and muffled sound. When setting up to record a presentation with voiceover, choose a quiet room and test your audio levels prior to pressing record.

6
Integrate Your Camera Feed for Personal Connection
Showing your face builds immediate rapport and trust. Facial expressions and eye contact convey enthusiasm and nuanced meaning that audio alone cannot deliver. Utilizing a layout designed for slide webcam record setups helps maintain high viewer engagement and creates a human connection similar to classroom or meeting environments.

7
Engage Your Audience with Direct Eye Contact
A major mistake in virtual presentations is staring solely at slide notes or the screen center. Whenever you explain key ideas, look directly into your camera lens to simulate direct eye contact with your audience. If you need to record PowerPoint with webcam overlays, position your recording window right beneath the camera so your eyes naturally align with the lens.

8
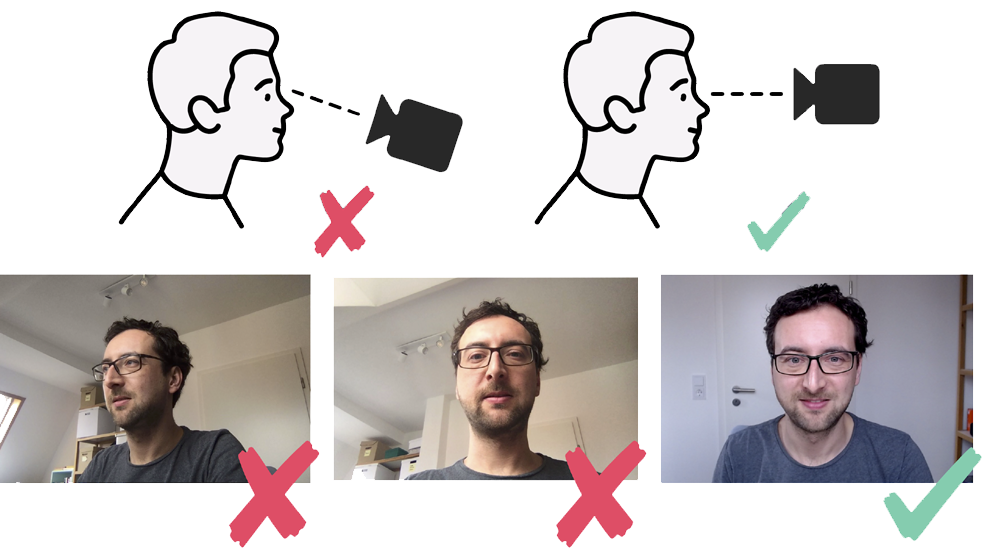
Position Your Camera at Eye Level
Camera angle drastically alters how your audience perceives you. Low camera angles looking up from a desk can appear unflattering or overly intimidating. Position your laptop or webcam at eye level using a stand or books. This neutral angle fosters a warm, professional, and balanced presence.
9
Apply a Blurred or Virtual Background
Background distractions can pull viewer focus away from your presentation message. If your physical workspace is cluttered, apply a subtle background blur or choose a clean virtual background. Ensure your lighting is bright and even so your camera cleanly separates your profile from the background without harsh visual glitches.

10
Rehearse and Perform Test Recordings
Polished delivery comes from deliberate practice. Run through your slides out loud to catch awkward transitions, verify timing, and polish your narrative flow. Take advantage of an online slide recorder to record a short 30-second test clip. Review your test video to check mic volume, webcam framing, and slide clarity before recording your final video presentation.

Video Presentation Best Practices Checklist
- Design a clean, professional title slide to make a strong first impression.
- Apply presentation design best practices by keeping slide layouts uncluttered with ample white space.
- Incorporate high-resolution images and maintain consistent typography throughout.
- Use an external USB microphone to capture crisp, noise-free audio.
- Combine your slide deck with webcam footage to build visual trust.
- Look directly at the camera lens to simulate direct eye contact with your audience.
- Elevate your webcam to eye level and use background blur when appropriate.
- Conduct short test recordings in a web-based presentation recorder prior to final publishing.
Frequently Asked Questions
Focus heavily on clear audio quality, keeping slide content minimal, looking into the camera lens, and recording with an easy-to-use presentation recorder that supports slide and webcam overlays simultaneously.
For optimal audience engagement, recorded presentations should ideally run between 5 to 15 minutes. If you have extensive material, break the topic down into modular, bite-sized chapters or shorter micro-lessons.
You can use dedicated web-based tools like Slideator to record PowerPoint presentations with webcam feeds directly in your browser without needing complex video editing software.